|
 BOYCOTT ISRAEL CAMPAIGN |
||||||||
|
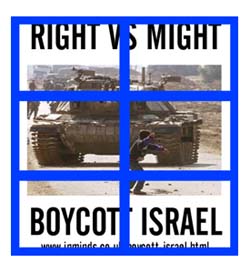
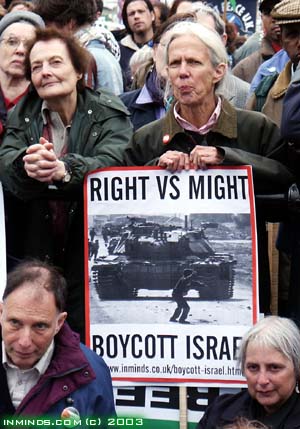
BOYCOTT ISRAEL POSTERS We have designed several posters for use on placards in demonstrations, etc. All the posters are in PDF format and print tiled across 6 pages (2 sheets landscape width by 3 sheets height). The full size of the poster is 57cm width by 60cm height. They can be mounted on A1 size boards or on standard 20" x 30" boards (if the empty side strips are trimmed off). All the posters are in colour but still look great if printed in black.
INSTRUCTIONS Things you will require:
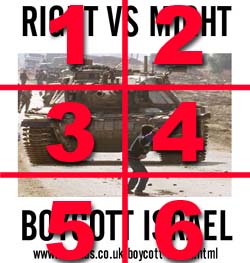
1. Download Poster Choose which poster you wish to download. Click on the image below, it will open the poster PDF file in another browser window, whilst you continue following the instruction here.
2. Print Poster In the other browser window you should now be able to see acrobat reader open with an intro page showing the poster with some text on the right and thumbnails of all the pages on the left. There should be 7 pages, 6 for the poster numbered 1-6 plus the unnumbered intro page. Click on the print button. First ensure that your printer is set for LANDSCAPE printing (click the properties button, then check that in orientation the landscape box is ticked, then press OK to close the printer properties dialog box). Next in the print options dialog box make sure that "Shrink oversized pages to paper size" and "Expand small pages to paper size" options are ticked. Then select "Print Range" pages from 1 to 6 to print and press OK. While its busy printing, you may want to save the PDF file to your hard-disk at this stage so that later you can email it to all your friends or print more copies..
3. Trim Pages
Six pages should have printed as shown above. Because printers cannot print right to the edge of the paper, you will see a 5mm border around each page. These need to be trimmed off carefully using a paper trimmer. This is a delicate operation - trim too much and the jigsaw wont come together properly, trim too little and an unsightly white line will remain across the poster. Note you only need to trim where the red lines appear above - where two sheets come together. Having visited our local stationary store it seems that the largest popular size for sturdy boards is 20" x 30". This is smaller than A1. If you are planning to mount the poster on a 20" x 30" board then you need to also trim the empty edge strip (4cm wide) on each side as shown in red below, otherwise the poster wont fit the board.
We particularly liked the "foam boards" which whilst being rigid were also very light due to the 5mm layer of foam between the two sides. A 20" x 30" foam board costs £2 (UK).
4. Assemble Poster For best results use double-sided sticky tape for mounting the pages on to the sturdy board. The tape needs to be applied to the sturdy board along the blue lines indicated below - along the lines where the pages meet each other and at their edges. Start from the centre and work outwards, this will ensure your poster is centered on the board. This is where the ruler and pencil are used, measure the midpoint along the width of the board and mark the centre vertical line. Place the 6 pages along this line to work out the position of all the other lines. Then apply the double sided sticky tape to the board along these lines. Next carefully position the pages on to the board. Ensure that where ever two pages meet they share the sticky tape, half width each, that way no peeling of the pages will occur half way through the rally!
URL: http://www.inminds.com/boycott-posters.html |
||||||||